Sand Blast cabinet Light Upgrade
DIY LED LIGHTING UPGRADE FOR SAND BLAST CABINET
The oem lighting in the SBC series (SBC90, SBC180, SBC220, SBC350, SBC420, SBC990, SBC1200) of sand blast cabinets is ok to get you started, like most of the blast cabinet most of it needs upgrading, lighting being of them. If you have an item in the cabinet that isn't totally flat then the lighting casts a huge shadow on the face of the item you are blasting. Couple this with the other issues and it means you just can't see anything.
The short term fix is to use a rechargeable LED workshop light. We got fed up of this, so decided to upgrade the lighting on a more permanent basis. Here's what we did:-
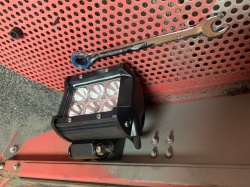
We fitted individual LED floodlights. Make sure you buy floodlights not spotlights. the wider the angle the better.
things you will need :-
- Drill and drill bits
- spanners/ pliers
- wire cutters
- soldering iron
- insulation tape
- cable conduit
- lights
- power suppoly
- P clips or similar
- Rivnuts and bolts
Upgrade your SandBlast cabinet lighting!
So we started off by purchasing a big enough power supply. We wanted an enclosed unit, with protections, and plenty of spare power, so it doesn't run too hot. We opted for 4x 18W led floodlights. running these at 12V should give us a max draw of 72 Watts. Our power supply is rated to 400 (the SBC1200 has a secondary blasting position, so we may double up the lighting later).
We decided to drill and install rivnuts for the parts as the easiest way for us to do a tidy job. We also wanted to create the minimum amount of fuss inside the cabinet.

We sited the PSU next to the existing lighting/ extraction switch. As we have removed the existing extractor, and upgraded it (another post in the future!), we will use the extractor switch output to run our extra lighting.

You can see here it fits nice and secure out of the way.

Once this is done we ran a temporary feed and tested each light worked. After that we started fitting the LED floodlights into the sand blast cabinet.

The first two lights we installed down by the grate.

the next step is to carry the wiring outside safely. For this we used Bulkhead wiring glands. The wire is sealed outside, so sand wont get out, and extra air won't get in. They look tidy as well.


Next up is to install the other LED floodlight into the blast cabinet, and then the higher up lights. should look something like this once completed.


So you now need to connect all of the lights up to the power supply. I found the easiest way was to run the wiring to the three lights furthest away from the power adaptor, and then use the existing wiring conduit for the last one. we use Jubilee P Clips and plastic flexible wiring conduit to secure the wiring avoiding moving parts of the cabinet.

Lighting as the cabinet comes looks like this...

And with the DIY Sand Blast cabinet lighting upgrade complete.....


Costs for
Rivnuts £5
Wire £10
Lights £30
PSU £20